Context menu option in Egnyte Connect UI
Introduction
Your product can be instantly accessible to Egnyte customers through a UI integration, which puts your options in the context menu for files and folders.
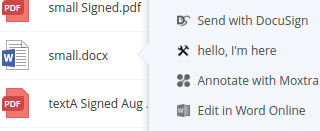
This is how some of our existing partners provide preview and manipulation functionality for specific file types.
Use this recipe if you:
- want have your functionality available in Egnyte UI context menus.
- want to handle one or many files or folders and perform a simple action on them based on user input
- want to show screens and interact with the user who chose to use your option
Ingredients
- Two tablespoons of understanding: Egnyte-specific terms
- UI Integration Framework
- Development environment with access to App Definition form (ask your partner account manager)
- App Definition for your app
Steps
As you see, there's no Auth mentioned in ingredients. That's because Egnyte is going to send API access tokens in invocations.
It's important for UI Integrations to keep this token a secret (not expose it to the browser by passing it in URLs, cookies or localStorage).
- Go to your development sandbox domain, open Apps & Integrations, click to "Manage my app definition" and switch type to Egnyte UI Integration
- Fill it in according to App Definition docs. Focus on configuring endpoint URLs you want to implement. You need to provide the
integrationsfield as JSON. - Go back to Apps & Integrations, find your app on the listing and enable, then switch from admin mode to user mode and add it for your current user.
- Read about UI Invocation and implement first two steps - the POST endpoint and the
browserFacingUrlhandler - Run it from the context menu of your sandbox domain for testing.
- If you don't have any reason to do otherwise, follow the Suggested steps to ensure invocation is securely handled to pin the invocation input to user session as step 3. Important: make sure the url you send back to Egnyte can't be used by someone else. If you don't want to use the suggested steps or you're having trouble following the diagram, get in touch
- Build your functionality using the token passed in invocation to fetch files and save changes.
- Bake your integration and send it for certification.